Beat the MOT Blues: Common Used Car Failures & How to Prep in the UK
For any car owner in the UK, the annual MOT test can often feel like a looming dark cloud on the automotive horizon. It's a statutory requirement, designed to ensure your vehicle meets minimum road safety and environmental standards. While the thought of a potential fail and subsequent repair bills can be daunting, the truth is that a significant number of MOT failures stem from surprisingly simple, often overlooked issues that could easily be rectified at home with a bit of proactive checking.
Here at CarsLink.ai, we believe in empowering used car owners. This guide will walk you through the most common MOT failure points for used cars and, crucially, how to perform basic DIY checks to give your vehicle the best possible chance of a pass. Beat the MOT blues, save money, and keep your wheels safely on the road!
Lighting & Electrics: Shedding Light on Common Fails
One of the most frequent reasons for an MOT failure is issues with a car's lighting and electrical system. The good news? Most of these are incredibly easy to spot and fix.
What to check:
- Headlights: Get a friend or family member to help you. Turn on your dipped beam and then your main beam. Walk around the car to ensure both sides are working correctly and have a similar light output. Check their alignment – if they appear to be pointing erratically, this could be an MOT failure, although adjustment typically requires a garage.
- Brake Lights: Ask your helper to press the brake pedal while you check the rear of the car. Ensure all three brake lights (if your car has a high-level one) illuminate brightly. A common issue is a blown bulb, which is often a quick and inexpensive fix.
- Indicators & Hazards: Activate your indicators one by one, checking all four corners of the car. Don't forget to test your hazard warning lights too – they should all flash in unison. An indicator flashing too quickly can signal a blown bulb on that circuit.
- Other Lights: Don't overlook your rear fog lights, reversing lights (check by putting the car in reverse with the engine running, ensuring the handbrake is on!), and critically, your number plate lights. These must illuminate your registration plate clearly at night. Reflectors (usually integrated into light clusters or bumpers) must also be present and undamaged.
DIY Tip: Keep a spare bulb kit for your car. Replacing a blown bulb is often a straightforward process documented in your car's owner's manual. A quick fix could save you a retest fee!
Tyre Health: Your Car's Only Contact with the Road
Your tyres are fundamental to your car's safety, providing the crucial grip for steering, braking, and accelerating. Unsurprisingly, tyre issues are a major contributor to MOT failures.
What to check:
- Tread Depth: The legal minimum tread depth across the central three-quarters of the tyre is 1.6mm around its entire circumference. A simple way to check this is using a 20p coin. Insert the coin into the main tread grooves of your tyre. If the outer band of the 20p coin is visible, your tread depth might be below the legal limit and could result in a fail. Check this in several places across each tyre.
- Tyre Pressure: While incorrect tyre pressure isn't a direct MOT fail, tyres that are severely under-inflated can suffer from accelerated wear, leading to issues like illegal tread depth or structural damage. Always maintain the correct pressure as specified in your owner's manual or on a sticker typically found inside the driver's door pillar or fuel filler flap.
- General Condition: Visually inspect the sidewalls and tread for any signs of damage. Look out for bulges (indicating internal damage), cuts, cracks, or embedded objects like nails or screws. Any significant damage could lead to a fail. Remember to check all four tyres, including the often-forgotten inner sidewalls.
DIY Tip: Regularly rotate your tyres (if recommended by your manufacturer) and get them balanced and aligned. This prolongs tyre life and helps prevent uneven wear that could prematurely lead to illegal tread depths.
Brake Performance: Stopping Safely and Legally
Brakes are arguably the most critical safety system in your car. Any compromise here is not just an MOT fail but a serious safety hazard.
What to check:
- Warning Signs: Pay attention to how your brakes feel. Any grinding, squealing, or scraping noises when braking are clear indicators of worn brake pads. A spongy pedal, or one that requires excessive pressure, suggests potential fluid issues or air in the system. If the car pulls to one side under braking, it could indicate uneven brake wear or a fault in one of the calipers.
- Brake Fluid Levels: Pop your bonnet and locate the brake fluid reservoir (it usually has a yellow cap and a symbol of a circle with brackets). Ensure the fluid level is between the 'min' and 'max' markers. Low fluid can indicate a leak or severely worn pads. Do not top up brake fluid unless you know the correct type for your vehicle and are certain it's not masking a problem.
- Disc and Pad Inspection: Where possible, visually inspect your brake discs and pads through your wheel spokes.
- Discs: Look for deep grooves, scoring, or excessive rust that can indicate wear. The disc surface should be relatively smooth.
- Pads: You should be able to see a visible thickness of the pad material against the disc. If the pads look very thin (less than a few millimetres), they'll likely need replacing soon.
DIY Tip: While deeper brake inspection and repair should be left to qualified mechanics, being aware of these signs can prompt you to get professional help before your MOT, potentially saving you a retest fee and ensuring your safety. Always test your handbrake on a gentle slope to ensure it holds the car securely.
Visibility: Clear Views, Clear Pass
Your ability to see clearly out of your car is paramount to safe driving. The MOT test takes this very seriously, scrutinising your windscreen, wipers, and mirrors.
What to check:
- Windscreen Damage: Inspect your windscreen for chips and cracks. The location and size of damage are critical for an MOT.
- Zone A: This is the area directly in the driver's line of sight (a 290mm wide strip centred on the steering wheel). Any damage larger than 10mm in Zone A is an MOT fail.
- Anywhere else on the windscreen: Damage larger than 40mm anywhere else on the screen will also result in a fail. Small chips are often repairable by specialists, so get them checked sooner rather than later.
- Wiper Blades: Lift your wiper arms and inspect the rubber blades. Look for cracks, tears, or hardening of the rubber. Wipers that streak, judder, or don't clear the screen effectively will fail the MOT. They are inexpensive and easy to replace.
- Washer Fluid & Jets: Top up your washer fluid reservoir (often blue-capped under the bonnet) with a good quality screenwash. Then, activate your windscreen washers. Ensure the jets deliver fluid onto the screen effectively and that the wipers clear it away cleanly. Blocked jets are a common, easy-to-fix problem – sometimes a thin pin can clear them.
- Mirrors: Ensure all mirrors (interior and exterior) are securely fitted, free from significant damage, and adjustable.
DIY Tip: Always keep your washer fluid topped up, especially with a suitable anti-freeze screenwash in winter. Changing wiper blades every 6-12 months is good practice for both safety and MOT success.
Simple DIY Checks: Empowering Your MOT Prep
Beyond the specific points above, adopting a routine of general car checks can significantly improve your MOT chances and overall driving safety.
General Pre-MOT Checklist:
- Horn: Give your horn a quick press. It must work and produce a continuous, uniform sound.
- Seatbelts: Pull each seatbelt out to its full extent, checking for cuts, fraying, or damage. Ensure the buckle clicks securely and the belt retracts properly.
- Fluid Levels (beyond brake fluid): Check your engine oil, coolant, and power steering fluid levels. While not direct MOT failure points unless dangerously low or leaking, ensuring they are at the correct levels is good practice and prevents advisories.
- Exhaust System: Start your car and listen for any unusually loud noises, blowing sounds, or rattles from the exhaust. Visually inspect the exhaust pipe and silencers for significant rust or holes.
- Fuel Cap: Ensure your fuel cap is present and securely fitted. Missing or poorly fitting caps can sometimes lead to emissions issues or minor advisories.
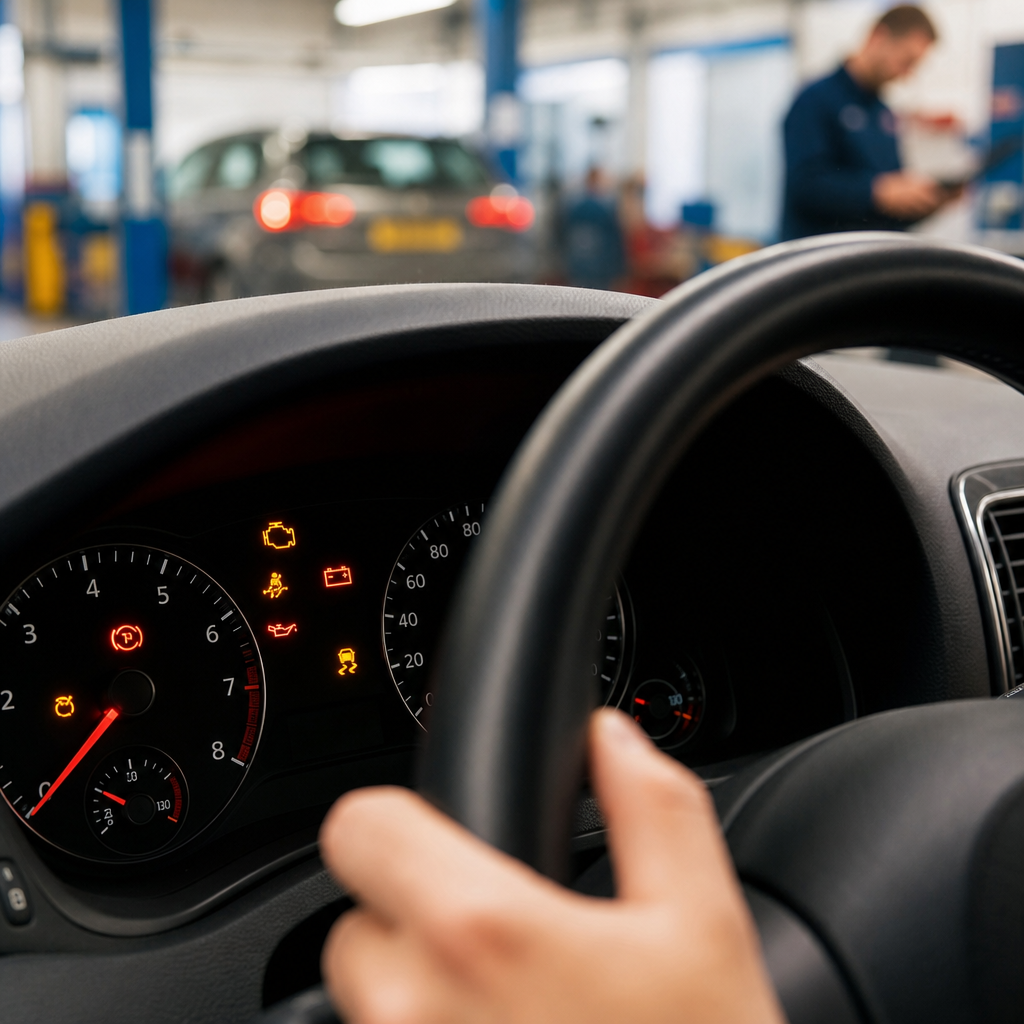
- Dashboard Warning Lights: Before your MOT, ensure no persistent warning lights are illuminated on your dashboard (e.g., engine management light, ABS, airbag). These almost guarantee an MOT failure.
- Number Plates: Make sure your front and rear number plates are clean, securely fitted, and not obscured by dirt or damage. The characters must be clearly legible.
DIY Tip: Maintain a small car care kit in your boot with items like screenwash, a rag, and spare bulbs. Develop a habit of a quick weekly walk-around check of your car – it takes minutes but can save you hours of hassle and pounds in repair costs down the line.
Conclusion
The MOT test doesn't have to be a source of anxiety. By taking a proactive approach and dedicating a small amount of time to these simple DIY checks, you can address the most common reasons for MOT failures before you even set foot in a test centre. Not only will this increase your chances of a first-time pass, saving you potential retest fees and unexpected repair bills, but it will also give you greater confidence in the safety and roadworthiness of your beloved used car.
So, before your next MOT, give your car the once-over it deserves. It's a small investment of time for significant peace of mind. And remember, when you're ready for your next set of wheels, CarsLink.ai is here to help you find the perfect used car that will breeze through its MOT for years to come!